Read about Surveys Update | for Video select CC and preferred language for subtitles
• SURVEYS Update
A cool new feature we’ve added to Rainbow Surveys to make them way more interactive and engaging for your customers.
First, head over to the Survey Definition section in the Admin panel , Surveys definition. You’ll see the two templates we already have set up for you.
Today, we’re focusing on this new section we’ve added called the “Two-Step” feature—you can enable it on any of your existing templates.
Let’s open one up and I’ll show you exactly how to turn it on.
Before we get there, check this out: we’ve added easy ways to upload your own logo or a custom image that appears right on the survey.
For the logo, aim for something around 100 to 300 pixels wide—keeps it crisp without being too heavy. For a custom image, go with about 800×600 pixels for the best look.
Just select your logo file and upload it… done.
Now do the same for your custom picture—upload that one too.
Scroll down a bit, and you’ll spot the new “Step 2” toggle.
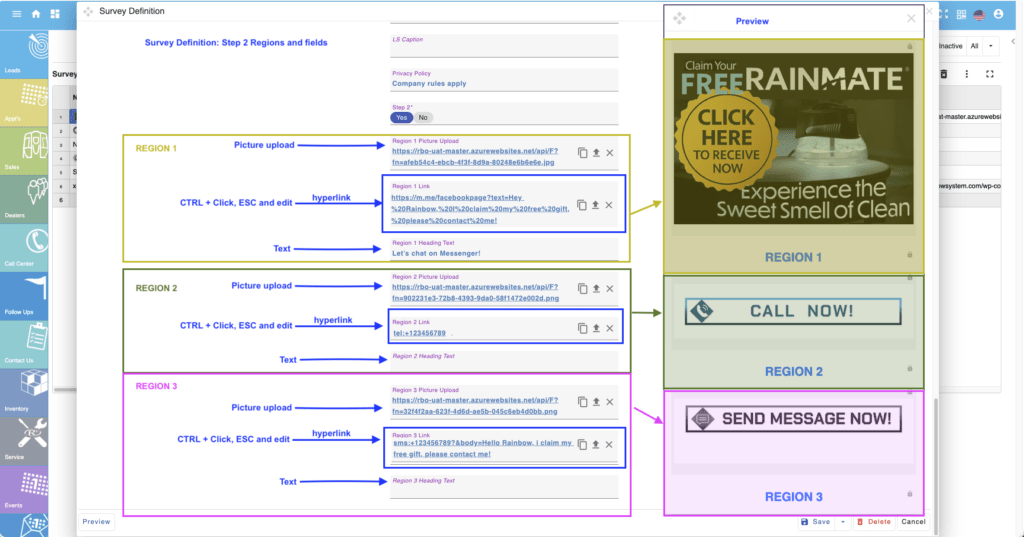
Flip that on, and you’ll unlock three regions: Region 1, Region 2, and Region 3.
Each region has 3 key fields: one for uploading a picture (again, 800×600 recommended), one for the link/action, and one for optional caption text (or heading text) that shows below the image.
For example, in Region 1, this is the picture that pops up in the second step after they submit the main survey. Here’s what it looks like loaded in.
The link field is where the real interactivity happens—this is the action that triggers when someone clicks or taps the image. It can open any URL you want. In our demo here, we’ve set it to a Facebook page link with a pre-filled message in Messenger: something like “Hello Rainbow, I claim my free gift, please contact me!”
You can totally customize that pre-filled text—swap in your business name, your Facebook page details, your marketing phone number, whatever works for you. To edit it, hold down the Ctrl key and click the field with your mouse, then hit Escape to enter edit mode. Use your arrow keys to move around and make changes.
Quick tip for spaces: replace any space with %20 (like Hello%20Rainbow)—it’ll convert to proper spaces when the link opens.
The caption/heading text is optional and shows right below the picture—great for a short call-to-action like “Claim your offer now!” or “Follow us for deals.”
You’ll notice none of this shows in the standard preview—that’s because it’s all tied to Step 2.
To see it live, let’s switch to a dealer profile. I’ll pull up an appointment, go to Customer Options > Survey QR, and grab the one labeled “New Facebook Survey 2 Step.” Click Share and copy the link.
Here’s what the customer sees: your uploaded logo at the top, the custom picture…
They fill out the survey like normal, hit Submit… and boom—Step 2 pops up with those interactive images.
When they tap one, it fires the action: opens Facebook Messenger with the ready-to-go message (just hit send), or it could trigger a phone call, text, WhatsApp, open your website—whatever you set for Regions 2 and 3.
Super smooth way to turn survey feedback into immediate action.
Now, let’s talk about handling those Survey Submissions.
Up on the top blue bar, you’ll see a new icon with a little red badge showing a number—that’s your count of unprocessed surveys waiting for attention.
We built this into RBO to keep new submissions right in your face so you never miss one and can process them fast.
Click the icon, and a pop-up grid appears with all the unprocessed surveys. From here, review them quick, create leads, book appointments.
For security, we’ve completely removed the delete option.
If a submission looks off, you can only reject it.
That’s the full scoop on this update—two-step interactive pop-ups plus better submission handling.

Read about Lead and Dealer Updates | for Video select CC and preferred language for subtitles
• SURVEYS Update
A cool new feature we’ve added to Rainbow Surveys to make them way more interactive and engaging for your customers.
First, head over to the Survey Definition section in the Admin panel , Surveys definition. You’ll see the two templates we already have set up for you.
Today, we’re focusing on this new section we’ve added called the “Two-Step” feature—you can enable it on any of your existing templates.
Let’s open one up and I’ll show you exactly how to turn it on.
Before we get there, check this out: we’ve added easy ways to upload your own logo or a custom image that appears right on the survey.
For the logo, aim for something around 100 to 300 pixels wide—keeps it crisp without being too heavy. For a custom image, go with about 800×600 pixels for the best look.
Just select your logo file and upload it… done.
Now do the same for your custom picture—upload that one too.
Scroll down a bit, and you’ll spot the new “Step 2” toggle.
Flip that on, and you’ll unlock three regions: Region 1, Region 2, and Region 3.
Each region has 3 key fields: one for uploading a picture (again, 800×600 recommended), one for the link/action, and one for optional caption text (or heading text) that shows below the image.
For example, in Region 1, this is the picture that pops up in the second step after they submit the main survey. Here’s what it looks like loaded in.
The link field is where the real interactivity happens—this is the action that triggers when someone clicks or taps the image. It can open any URL you want. In our demo here, we’ve set it to a Facebook page link with a pre-filled message in Messenger: something like “Hello Rainbow, I claim my free gift, please contact me!”
You can totally customize that pre-filled text—swap in your business name, your Facebook page details, your marketing phone number, whatever works for you. To edit it, hold down the Ctrl key and click the field with your mouse, then hit Escape to enter edit mode. Use your arrow keys to move around and make changes.
Quick tip for spaces: replace any space with %20 (like Hello%20Rainbow)—it’ll convert to proper spaces when the link opens.
The caption/heading text is optional and shows right below the picture—great for a short call-to-action like “Claim your offer now!” or “Follow us for deals.”
You’ll notice none of this shows in the standard preview—that’s because it’s all tied to Step 2.
To see it live, let’s switch to a dealer profile. I’ll pull up an appointment, go to Customer Options > Survey QR, and grab the one labeled “New Facebook Survey 2 Step.” Click Share and copy the link.
Here’s what the customer sees: your uploaded logo at the top, the custom picture…
They fill out the survey like normal, hit Submit… and boom—Step 2 pops up with those interactive images.
When they tap one, it fires the action: opens Facebook Messenger with the ready-to-go message (just hit send), or it could trigger a phone call, text, WhatsApp, open your website—whatever you set for Regions 2 and 3.
Super smooth way to turn survey feedback into immediate action.
Now, let’s talk about handling those Survey Submissions.
Up on the top blue bar, you’ll see a new icon with a little red badge showing a number—that’s your count of unprocessed surveys waiting for attention.
We built this into RBO to keep new submissions right in your face so you never miss one and can process them fast.
Click the icon, and a pop-up grid appears with all the unprocessed surveys. From here, review them quick, create leads, book appointments.
For security, we’ve completely removed the delete option.
If a submission looks off, you can only reject it.
That’s the full scoop on this update—two-step interactive pop-ups plus better submission handling.
SUPPORT TICKETS tool
RAINBOW SERVICE Module
CRF/ICL Submit & Digital Checklist
SURVEYS Update
• SURVEYS Update
A cool new feature we’ve added to Rainbow Surveys to make them way more interactive and engaging for your customers.
First, head over to the Survey Definition section in the Admin panel , Surveys definition. You’ll see the two templates we already have set up for you.
Today, we’re focusing on this new section we’ve added called the “Two-Step” feature—you can enable it on any of your existing templates.
Let’s open one up and I’ll show you exactly how to turn it on.
Before we get there, check this out: we’ve added easy ways to upload your own logo or a custom image that appears right on the survey.
For the logo, aim for something around 100 to 300 pixels wide—keeps it crisp without being too heavy. For a custom image, go with about 800×600 pixels for the best look.
Just select your logo file and upload it… done.
Now do the same for your custom picture—upload that one too.
Scroll down a bit, and you’ll spot the new “Step 2” toggle.
Flip that on, and you’ll unlock three regions: Region 1, Region 2, and Region 3.
Each region has 3 key fields: one for uploading a picture (again, 800×600 recommended), one for the link/action, and one for optional caption text (or heading text) that shows below the image.
For example, in Region 1, this is the picture that pops up in the second step after they submit the main survey. Here’s what it looks like loaded in.
The link field is where the real interactivity happens—this is the action that triggers when someone clicks or taps the image. It can open any URL you want. In our demo here, we’ve set it to a Facebook page link with a pre-filled message in Messenger: something like “Hello Rainbow, I claim my free gift, please contact me!”
You can totally customize that pre-filled text—swap in your business name, your Facebook page details, your marketing phone number, whatever works for you. To edit it, hold down the Ctrl key and click the field with your mouse, then hit Escape to enter edit mode. Use your arrow keys to move around and make changes.
Quick tip for spaces: replace any space with %20 (like Hello%20Rainbow)—it’ll convert to proper spaces when the link opens.
The caption/heading text is optional and shows right below the picture—great for a short call-to-action like “Claim your offer now!” or “Follow us for deals.”
You’ll notice none of this shows in the standard preview—that’s because it’s all tied to Step 2.
To see it live, let’s switch to a dealer profile. I’ll pull up an appointment, go to Customer Options > Survey QR, and grab the one labeled “New Facebook Survey 2 Step.” Click Share and copy the link.
Here’s what the customer sees: your uploaded logo at the top, the custom picture…
They fill out the survey like normal, hit Submit… and boom—Step 2 pops up with those interactive images.
When they tap one, it fires the action: opens Facebook Messenger with the ready-to-go message (just hit send), or it could trigger a phone call, text, WhatsApp, open your website—whatever you set for Regions 2 and 3.
Super smooth way to turn survey feedback into immediate action.
Now, let’s talk about handling those Survey Submissions.
Up on the top blue bar, you’ll see a new icon with a little red badge showing a number—that’s your count of unprocessed surveys waiting for attention.
We built this into RBO to keep new submissions right in your face so you never miss one and can process them fast.
Click the icon, and a pop-up grid appears with all the unprocessed surveys. From here, review them quick, create leads, book appointments.
For security, we’ve completely removed the delete option.
If a submission looks off, you can only reject it.
That’s the full scoop on this update—two-step interactive pop-ups plus better submission handling.